
“Ohh, the weather outside is frightful…” So doesn’t staying inside sound so delightful? As temperatures decline and snow begins to blanket the ground, many parents seek ways to keep their children entertained. Instead of reaching for that tablet computer, try engaging their senses with these holiday craft ideas!
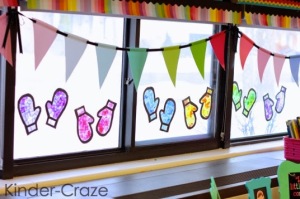
1. Stained Glass Mittens
Adorn the windows of your house this winter with these stained glass-style mittens. For this activity, your child can make a matching pair of mittens out of tissue paper to brighten up your home this holiday season!
Materials needed:
- Tissue paper
- Two sheets of 12 x 18″ clear contact paper
- Black construction paper
- Optional: Stained Glass Mitten Template (FREE)
Instructions:
- Preparation:
- Select different shades of tissue paper and cut into 1 inch squares.
- Print free template and trace onto black construction paper.
- Peel sheets of contact paper and placing one sheet sticky-side-up.
- Place both mitten frames side by side on top of sticky paper.
- Cut 1/2″ strips of construction paper to create cuffs on mittens.
- Now your child is able to lay pieces of tissue paper onto the mittens, ultimately creating beautiful stained glass art!
- Once mittens are filled with tissue paper, place the second sheet of contact paper sticky-side-down on top of the project to seal all of the tissue paper inside.
- To finish, you or your child should trim the excess paper around their mittens (using the black outline for reference.)
- With a little bit of scotch tape, these stained glass mittens are ready to display on your windows!
To see the full tutorial with pictures for this cute project, visit the Kinder Craze blog.
2. Tactile Christmas Tree
This is a fun, accessible craft that is sure to entertain your child this holiday season. Bonus: you can add the finished product to your holiday decor!
Materials needed: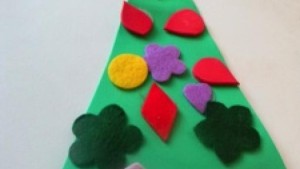

- Scissors
- Hole punch
- Foam sheets
- Velcro dots
- Felt shapes
- Pipe cleaners
Instructions:
- Preparation:
- Cut large foam sheet into a triangle and punch a hole in the top.
- Cut a couple of ornament shapes out of different colored foam.
- Start by attaching velcro dot stickers to the foam tree.
- Next, your child can attach felt shapes to velcro dots. (This activity is great practice for fine motor skills!)
- If you cut shapes out of foam, place velcro on them so they stick to the tree.
- Your child will enjoy the different textures of these materials. And because the decorations are attached with velcro, the design is able to be changed!
- Once this tree is complete, thread a pipe cleaner through the hole at the top of the tree so you can hang it up!
To view the original tutorial for this festive craft, click here.
3. Braille Apple Cinnamon Ornaments
Have you been trying to find easy handmade gifts that you can make with your child? These apple cinnamon ornaments make great gifts!
Materials needed:

- 1 cup applesauce
- 1 cup cinnamon
- Cookie cutters
- Drinking straw
- Toothpick
- Whole cloves
- Baker’s twine
Instructions:
- Mix 1 cup applesauce and 1 cup cinnamon in a bowl. (You may need to add a little more cinnamon, depending on the applesauce consistency. If you run out of cinnamon, whole wheat flour works fine, too.)
- Knead the mix until it reaches the consistency of cookie dough, not too soft nor too crumbly. Because the mix is safe to eat, your child can really help mix this up! (Note: Though the mix may sound delicious, it doesn’t taste that great.)
- Sprinkle some cinnamon or whole wheat flower on your working surface and lay down your dough for rolling.
- Use cookie cutters to make your ornaments and place them on a parchment lined cookie sheet. Your child can help push the cookie cutter into the dough, too!
- Once all of the ornaments are laid out on the cookie sheet, use a straw to make holes in the top of each ornament for hanging.
- Use a toothpick to make little 6-dot braille cells on each ornament to mark where you’ll place the cloves.
- Make letters by using cloves. Here is a cheat sheet of Braille letters and numbers if you need help with Braille.
- Bake ornaments at 200º for 1 hour. If you aren’t in a hurry to finish the ornaments, you may also leave the ornaments out to dry for 24-48 hours.
To view the original tutorial on this DIY gift, click here.
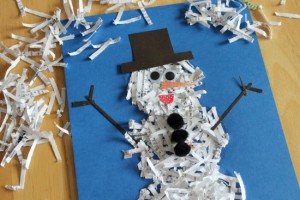
4. Shredded Paper Snowman:
Turn your shredded papers into a cute little snowman with this fun holiday craft!
Materials needed:
- Shredded paper from your electronic paper shredder. (Or you can shred paper with scissors or a paper trimmer.)
- 1 sheet of colored paper
- Pencil
- School or tacky glue
- Googly eyes and pom poms
- Colored paper scraps
- Optional: paintbrush
Instructions:
- With your pencil, draw three large circles onto colored paper to create the outline of the snowman.
- Add glue to each of the three circles one at a time; you can use the paintbrush to distribute glue evenly. (Glue one circle at a time so that the glue doesn’t dry before you attach shredded paper.)
- Spread shredded paper onto the glued circles. If shreds don’t fit into the outline, scrunch them a little. Press paper shreds down, making sure all papers stay in place. Shake off any extra paper that didn’t stick into the box. Continue filling until all circles of snowman’s body are full.
- Glue on googly eyes, black pom poms for buttons, and cut any embellishments you’d like to add out of colored paper scraps (hat, mouth, arms, nose, etc.)
To view the original tutorial for this fluffy snowman, click here.
5. Snow paint
Whipping up snow paint is so simple that you and your child can paint holiday cards and pictures whenever you want!
Materials needed: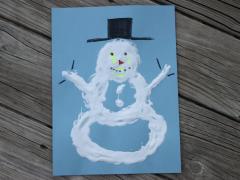
- Glue
- Shaving cream
- Paintbrushes (foam/sponge brushes recommended)
- Paper
Instructions:
- Mix one part shaving cream with one part glue.
- That’s it! Now you and your child can paint with the “snow.”
- Once the mixture dries, it dries up puffy like snow! Magic!
Click here to visit the original tutorial of this snow paint.
Now you may be wondering why I gave tutorials on crafts in an assistive technology blog. First, I absolutely love crafting! But most importantly, I feel the holiday season is the perfect opportunity to spend time with loved ones. These are just a few accessible projects that you and your children can enjoy together during this wintry season. Happy crafting and happy holidays! 🙂
